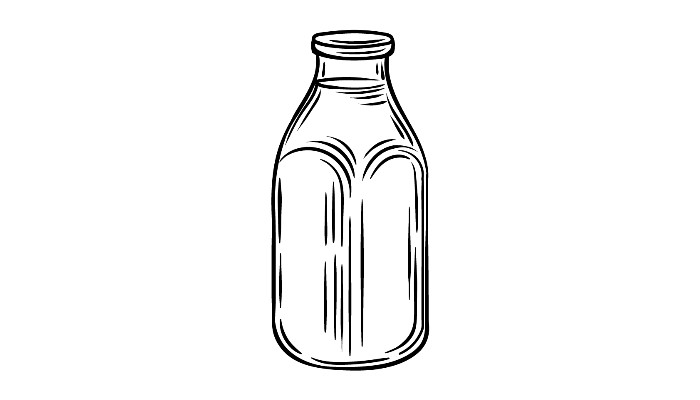
How to Draw Milk. Milk is a liquid that serves as the first substance that many young people and animals will consume! As we age, we also use cow’s milk for many foods, recipes, and other purposes. Milk can come in many different bottles and containers, and it was often common for milk to come in glass bottles in ancient times.
We’ve all seen those milk bottles before, but that doesn’t make learning to pump any less complicated. No need to worry, though, as this is the tutorial to follow if you want to know how it’s done. You can draw many more characters like bow and arrow drawing, Anubis drawing, betta fish drawing, cobra drawing, blueberry drawing, coconut drawing and many more cool drawings.
Drawing of Milk
Step 1:
We will represent milk in a glass bottle throughout this guide on how to draw milk. In this first step, we’ll keep things simple and nice. We’ll start with the cap and neck of the bottle, and you can start by drawing a thin, flat oval shape. Then use curved lines to create the thin edge of the lid. You can also add fine details to the rim and top of the lid. Then extend long, slightly curved lines downward from the sides of the base of the cap.
Step 2:
Glass bottles often have flat outlines and edges, and we’ll start drawing some of those details in this second step of the guide. You can start by drawing the top of the milk inside the bottle. You can do this by drawing another flat oval shape inside the neck of the bottle. Then draw a few lines near this oval shape to give the image a more dynamic look.
Next, we’ll draw two curved shapes below the surface of the milk you just drew. These will form the tops of the flat sections on the sides of the bottle, and we’ll add more to these details in the next few steps.
Step 3:
For this third step of our milk drawing guide, we’ll add a few more lines for the side outlines of the bottle. To do this, extend a few straight lines down from the curved edges near the top of the bottle you drew in a previous step. You can then draw a few more curved lines below the arcuate lines you drew for the flat edges of the bottle.
These will have smaller lines around them, and you can complete this step by drawing a straight line from the one on the right. Once you’ve reproduced these lines as they appear in the reference image, you’re ready for step 4!
Step 4:
We’re almost ready to start drawing the rest of the outline of the bottle, but first, we’ll add a few more details inside the bottle. In this step, you will add a bit more to the flat edges, and you can start by drawing a few more straight lines from the curved and arched lines from the previous steps.
To finish off the flat edges, these sections will also have curved sections at the bottom. If this seems a little confusing, it will soon become clear as long as you refer to the reference image! In the next step, we will finish the final elements and details.
Step 5:
Before coloring this picture, we have a few last details to add to conclude this fifth step of our guide on how to express milk. First, we will need to complete the outline of the bottle. Use a curved line for the base of the bottle, then add more rounded details near the inside perimeter of that outline.
Once you have completed all the final outlines and details, you can add additional elements and ideas! You can draw a background to show the environment this bottle is in, or you can show what you would like to taste with this delicious milk if it were real. How would you complete this picture?
Step 6:
You are now ready to finish this milk drawing with some color! Milk usually has a fairly distinctive creamy beige color, which we chose for our image. Because it’s in a glass bottle, we’ve used this beige color for most of the image. You can use different shades of these colors to create a more vibrant image, and you can also try ideas like drawing a logo on the bottle for more color possibilities.
More tips to make Milk drawing easier!
These 3 milk sketch tips will make it much easier and more fun! This milk drawing may look simple, but it cannot be easy to draw. The reason is that there are different surfaces on the bottle thanks to the square drawing of the bottom. One way to make this much easier would be to change the shape of the bottle. Some milk bottles will be rounded in this part of the bottle and you can change the shape. If you did that, you would probably have a much easier time drawing the shape of the bottle. It would also result in a unique image!
Another way to make this milk drawing easier would be to add a label to the bottle. Usually, this would cover the bottom of the bottle and contain images and text. You might be wondering how adding a label would make drawing easier. I would cover this part of the bottle, perhaps the most complicated part of the drawing. That way, there would be fewer of those complicated details to draw. It could help you get around those tricky parts and make your drawing more colorful and detailed.
Finally, you can also add other objects and skins to your milk sketch to help you while you draw. It is another tip where you may wonder how adding to the image will make things easier. Let’s say you’re having trouble with the bottom half of the milk bottle. If so, you can draw another object that covers that part. For example, you can do a breakfast scene, because milk is often associated with breakfast. This way you could include a bowl of cereal in front of the bottle of milk. So you will still be able to see the bottle, but the difficult part of the drawing will be covered.
Your milk drawing is complete!
That brings us to the future of this direction on drawing milk. Drawing objects like a milk bottle can often be more difficult than expected due to the angles and proportions that need to look good. As long as you follow all the steps we’ve outlined, you should be able to master it in no time! Now that you’ve mastered this image, you can finish it with your coordinates.
We’ve mentioned a few ideas like drawing a background or a label, but what else can you think of to add your touch? Be sure to check out our website, too, as we have guides covering just about every topic and style you can think of. We’ve got plenty more, so keep checking to catch them!
Also Read: Top 5 Luxurious Family-Friendly Hotels in Pakistan